MacにVagrantでCentOS7環境を作成
この手のチュートリアルはいっぱいありますが紹介します。
VagrantはVirtualbox上でできる仮装のVMで環境を壊してもいいのが特徴です。
でははじめてみましょう。
VirtualBoxをインストール
Vagrantには仮想化ソフトウェアは含まれていないので、Getting Startの言う通り、VirtualBoxをインストールしておきます(無料)。

VirtualBox以外にもVMwareやHyper-Vなどが使えるようです。
Vagrantをインストール
公式サイトのDownloadsからdmgをゲットしてインストール

CentOS7環境を作成
boxを新規追加
まずは環境の元になるboxと呼ばれるもの(仮想マシンのイメージファイル)をMacに新規追加します。centos/7 という公式boxがあるようなのでそれを使うことにします。
上記ページではいきなり vagrant init から始まっていますが、add でboxの新規追加からやっていきます。
$ vagrant box list
There are no installed boxes! Use `vagrant box add` to add some.
まだboxはありません。centos/7 を追加します。
VirtualBoxを使っているのでproviderは 3 を選択。
$ vagrant box add centos/7
==> box: Loading metadata for box 'centos/7'
    box: URL: https://atlas.hashicorp.com/centos/7
This box can work with multiple providers! The providers that it
can work with are listed below. Please review the list and choose
the provider you will be working with.

1) hyperv
2) libvirt
3) virtualbox
4) vmware_desktop

Enter your choice: 3
==> box: Adding box 'centos/7' (v1708.01) for provider: virtualbox
    box: Downloading: https://vagrantcloud.com/centos/boxes/7/versions/1708.01/providers/virtualbox.box
==> box: Successfully added box 'centos/7' (v1708.01) for 'virtualbox'!
Successfullyになりました。
ちゃんとboxが追加されたか確認してみます。
$ vagrant box list
centos/7 (virtualbox, 1708.01)
OKですね。
初期設定
centos7というディレクトリを作って、そこに環境をつくっていこうと思います。
ディレクトリを作って…
$ mkdir centos7
$ ll | grep centos7
drwxr-xr-x   2 sudachi808  staff    68  9 21 20:23 centos7
init で初期設定を行います。
コマンドライン引数には前項で追加した centos/7 というboxを指定します。
$ cd centos7/
$ vagrant init centos/7
A `Vagrantfile` has been placed in this directory. You are now
ready to `vagrant up` your first virtual environment! Please read
the comments in the Vagrantfile as well as documentation on
`vagrantup.com` for more information on using Vagrant.
$ ll
total 8
-rw-r--r--  1 sudachi808  staff  3352  9 21 20:24 Vagrantfile
ディレクトリ内に Vagrantfile というファイルが作成されていれば完了です。
ちなみに、Vagrantfile 仮想マシンのIPアドレスなどの各種設定が記載されています。
status で仮想マシンの状態を確認できます。
$ vagrant status
Current machine states:

default                   not created (virtualbox)

The environment has not yet been created. Run `vagrant up` to
create the environment. If a machine is not created, only the
default provider will be shown. So if a provider is not listed,
then the machine is not created for that environment.
default というのが仮想マシンの名前です。not created になっていますね。
まだ仮想マシンは作成されていないようです。
仮想マシンを起動
初期設定は完了しているので、ひとまず仮想マシンを起動してみます。
up で仮想マシンが起動します。
$ vagrant up
Bringing machine 'default' up with 'virtualbox' provider...
==> default: Checking if box 'centos/7' is up to date...
==> default: There was a problem while downloading the metadata for your box
==> default: to check for updates. This is not an error, since it is usually due
==> default: to temporary network problems. This is just a warning. The problem
==> default: encountered was:
==> default:
==> default: Couldn't resolve host 'atlas.hashicorp.com'
==> default:
==> default: If you want to check for box updates, verify your network connection
==> default: is valid and try again.
==> default: Clearing any previously set forwarded ports...
==> default: Clearing any previously set network interfaces...
==> default: Preparing network interfaces based on configuration...
    default: Adapter 1: nat
==> default: Forwarding ports...
    default: 22 (guest) => 2222 (host) (adapter 1)
==> default: Booting VM...
==> default: Waiting for machine to boot. This may take a few minutes...
    default: SSH address: 127.0.0.1:2222
    default: SSH username: vagrant
    default: SSH auth method: private key
    default: Warning: Remote connection disconnect. Retrying...
    default: Warning: Connection reset. Retrying...
    default: Warning: Remote connection disconnect. Retrying...
    default: Warning: Connection reset. Retrying...
    default: Warning: Remote connection disconnect. Retrying...
    default: Warning: Connection reset. Retrying...
==> default: Machine booted and ready!
==> default: Checking for guest additions in VM...
    default: No guest additions were detected on the base box for this VM! Guest
    default: additions are required for forwarded ports, shared folders, host only
    default: networking, and more. If SSH fails on this machine, please install
    default: the guest additions and repackage the box to continue.
    default:
    default: This is not an error message; everything may continue to work properly,
    default: in which case you may ignore this message.
==> default: Rsyncing folder: /Users/sudachi808/centos7/ => /vagrant
==> default: Machine already provisioned. Run `vagrant provision` or use the `--provision`
==> default: flag to force provisioning. Provisioners marked to run always will still run.
Machine booted and ready! らしいので状態を確認してみます。
$ vagrant status
Current machine states:

default                   running (virtualbox)

The VM is running. To stop this VM, you can run `vagrant halt` to
shut it down forcefully, or you can run `vagrant suspend` to simply
suspend the virtual machine. In either case, to restart it again,
simply run `vagrant up`.
running になりました。
仮想マシンが作成されて稼働中のようです。
ほんとうに仮想マシンが作成されたんでしょうか?
VirtualBoxのコンソールを起動してみます。
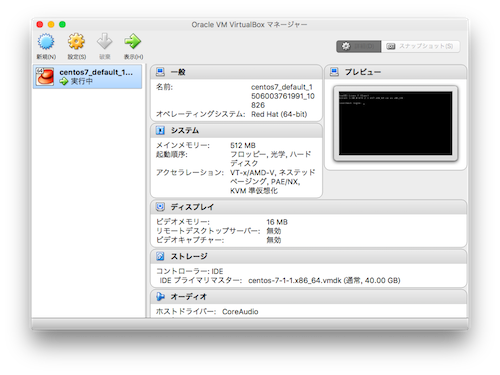
仮想マシンがちゃんと存在して実行中になっていますね。
OKなようです。
と、ここまでやると
「そのままVirtualBox使うのと何が違うんだ?」
と思いますが、まぁ違いません。
VirtualBoxのコンソールでの操作をコマンドラインでできるようにしてあるだけと言ってもいいです。
しかし、Vagrantfileとコマンドライン操作の組み合わせで、仮想マシンの操作が非常に簡便になっています。
特に仮想マシンを頻繁に作ったり壊したりするような場合や、多人数のPCに同じ環境を作りたいなど、オペミスの心配なく短時間で同じ環境を作成できるので、とても助かるはずです。
仮想マシンにログイン
起動した仮想マシンにログインしてみます。
ssh で仮想マシンにsshで接続できます。
$ vagrant ssh
[vagrant@localhost ~]$ cat /etc/redhat-release
CentOS Linux release 7.4.1708 (Core)
[vagrant@localhost ~]$
ログインできました。
たしかにCentOS7です。
ログインユーザーは vagrant になっていて…
[vagrant@localhost ~]$ sudo tail /var/log/messages
Sep 21 14:28:46 localhost systemd: Removed slice User Slice of vagrant.
Sep 21 14:28:46 localhost systemd: Stopping User Slice of vagrant.
Sep 21 14:36:35 localhost systemd: Created slice User Slice of vagrant.
Sep 21 14:36:35 localhost systemd: Starting User Slice of vagrant.
Sep 21 14:36:35 localhost systemd: Started Session 4 of user vagrant.
Sep 21 14:36:35 localhost systemd-logind: New session 4 of user vagrant.
Sep 21 14:36:35 localhost systemd: Starting Session 4 of user vagrant.
Sep 21 14:38:17 localhost su: (to root) vagrant on pts/0
Sep 21 14:38:17 localhost systemd: Starting Cleanup of Temporary Directories...
Sep 21 14:38:17 localhost systemd: Started Cleanup of Temporary Directories.
[vagrant@localhost ~]$ su -
Password:
Last login: Thu Sep 21 14:38:17 UTC 2017 on pts/0
[root@localhost ~]# exit
logout
[vagrant@localhost ~]$ exit
logout
Connection to 127.0.0.1 closed.
sudo と su が可能みたいですね。
仮想マシンを停止
halt で仮想マシンを停止します。
$ vagrant halt
==> default: Attempting graceful shutdown of VM...
状態を確認してみます。
$ vagrant status
Current machine states:

default                   poweroff (virtualbox)

The VM is powered off. To restart the VM, simply run `vagrant up`
poweroff になっています。
仮想マシンが停止したようです。
まとめ
- vagrant up
- vagrant ssh
- vagrant halt
この3つのコマンドで、コマンドラインから操作可能な仮想マシンが出来上がりました。
これで環境を壊しても怖くない!!!!!